shortcutaub.ie/classlist
The Class List App is a tool for accessing certain class data such as class rosters, student photos, and class messaging functions. Auburn University also uses Canvas which can provide some of these functions. Please refer to the table below to determine which system is best suited for your needs:
To access the Class List App, please navigate to AUAccess and then click on the Class List icon. You can find it under the Employee tab in the Academic Admin Tools card, or the Faculty tab in the Faculty Quick Access card. Alternatively, the Discover function can complete a search for the term "Class List."

Once you've entered the Class List App, you will be able to select a course and then view a roster, print a picture roster, or email a class using the following instructions.
Viewing a Class Roster
Once you have logged into the Roster Module, you will see the Course Listing. This page will display all courses you are currently teaching and have taught previously. You can scroll through the list, use the search function, or use the term dropdown menu to locate a certain course. Please note, however, that even if the course you're looking for is at the top of the list, you MUST use the term filter to select a specific term prior to gaining access to roster information.

Once you have found the class you are looking for, click on the Enrollment Count number to pull up the roster. Please note that the number may not look like a link, but you can still click it to pull up the roster.

Once the class roster pulls up, you can view details like course location, view expanded student details, export the roster to excel, print a photo roster, and email any number of students in the class.
To view the course location, click on the CRN near the top of the page and then select Instructor/Meeting Times.

To view more details about the students enrolled in your course, you have two options. The first is to hover your mouse over a particular student's name, and additional information on that student will appear in a box right beside the name along with a larger picture of the student.

To view additional information on all students, look for the dropdown menu at the top right of the class list that says Summary View. By clicking on that dropdown and selecting Detail View, you can see details about all enrolled students.

To export the entire list to Excel, start by checking the box on the far left of the screen right under the heading of Summary Class List. If you only want to export certain students, you can select the individual boxes by each photo.

Once you have the students selected, click the Export button in the top right-hand corner, and an Excel spreadsheet (you can select a .xls or xlsx file depending on your version of Excel) will download. It will contain all the information that is visible in the Summary Class List EXCEPT for pictures.

To find out how to view a class roster in Canvas, please click here.
Print Photo Roster
To print a roster with photos and names, you may want to start by eliminating some of the data columns. You can do that by selecting the columns dropdown to the left of the search function. Within that dropdown, check the boxes beside the data items you want to show, specifically photos and names.

The roster page will then only display the columns you selected. Once you have the correct data showing, click on the Print button in the top right-hand corner of the page.

A print preview screen will appear, and you can select the printer to use and other print options.

Emailing a Class
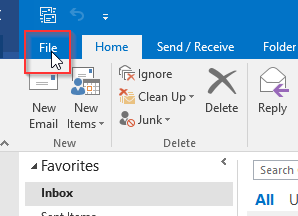
This function is designed to work with the Outlook email application. When using Outlook, prior to emailing a class through the Class List App the first time, you need to make sure that your settings allow you to send an email to a list separated by commas instead of semicolons. To do that, open up the Outlook application and click on the "File" tab.
Please be aware that Outlook has a 500 recipient limit per email message. If you teach a large section with over 500 students, you will need to open an additional new email message and split the recipients between the two. More information on email limits can be found at aub.ie/emaillimits.

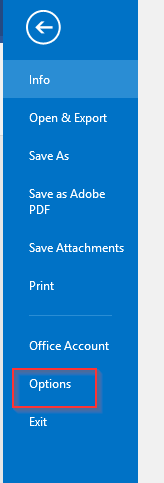
A new screen will appear, and then you will need to select Options on the left-hand side of the menu.

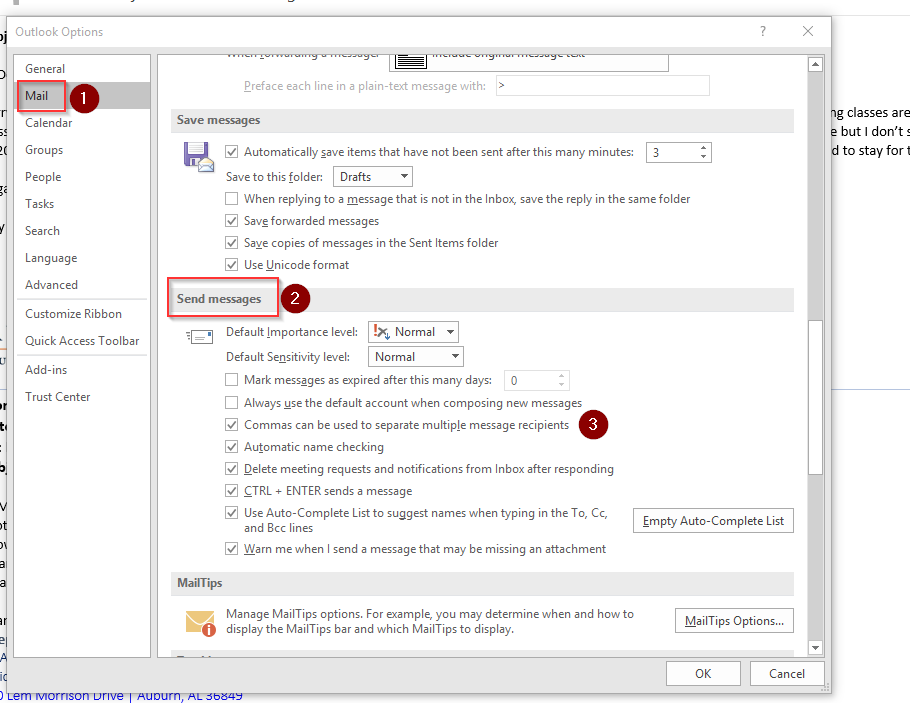
When the Options box opens, select the Mail tab on the left-hand side. Scroll through the Mail options that appear until you reach the Send Messages section. Within that section, make sure the box is checked for "Commas can be used to separate multiple message recipients" and then click OK at the bottom of the box. You should not have to do this step again unless you use a different device.

Once your settings are in place, navigate back to the Class List App. To email your class, you must start by selecting your recipients. To email the entire list, start by checking the box on the far left of the screen right under the heading of Summary Class List. If you only want to email certain students, you can select the individual boxes by each photo.

Once you have the recipients selected, click on the envelope icon to the left of the search section. A new email message will pop up using your computer's default email program (Outlook, MacMail, etc.), and the email addresses will already be populated and separated by commas. You can add a subject line, a message, and any necessary attachments prior to sending your email.

To find out how to email a class in Canvas, please click here.
Important Notes About Emailing
- Clicking this email button will open a new email message from the default mail program that is installed on your computer. If you use a web application for your email, DO NOT USE THIS FUNCTION. Instead, click here to find out how to send a message using Canvas.
- All the recipients of these emails will be listed in the "BCC" field. We recommend adding your own email address to the "To" field so you will receive a copy of the message in your inbox.
- Any replies to these emails will appear directly in your email inbox.
- Please be aware that Outlook has a 500 recipient limit per email message. If you teach a large section with over 500 students, you will need to open an additional new email message and split the recipients between the two. More information on email limits can be found at aub.ie/emaillimits.
Frequently Asked Questions
Q: Where can I find course information such as location and capacity if I'm not an instructor of record?
A: Start by logging into AUAccess and clicking on either the Employee Tab or the Faculty/Advisor Tab. In either tab, locate the section called Curriculum Management and click on the link called Schedule of Classes. From there, select a term from the dropdown menu and click the Submit button. A new page will bring up a list of subjects for all available courses during that term; find and click on the subject in question and then click the Course Search button. A new page will list all available courses in that subject for that term; locate the course you're interested in, and click on View Sections. A new page will list all the available sections along with the class days, class times, course capacity, instructor of record, term dates, and attributed college. Please note that you will not be able to see a list of students enrolled in the course, nor will you be able to message them from this screen; it is strictly for information purposes.
Q: How can I gain access to additional information beyond what is available in Class List App?
A: To gain access to additional course information, you must present a valid business reason to the Security Request Administrator within your unit and wait for approval. The tool we are currently using is called Restricted Roster Access, and you can check to see if you have access by navigating to AUAccess and clicking on either the Employee Tab or the Faculty/Advisor Tab. In either tab, locate the section called Curriculum Management and click on the link for Restricted Roster Access.
Q: Why can’t I see my entire class when I view my roster?
A: For larger classes, the Class List App may divide the roster across two or more pages. If you can’t see your entire class, scroll to the bottom of the roster and click on the ‘Next Page’ button. Please note that if you export or print your class list, the entire roster will be included.